


Shutter & shade installation guide
COVERLY INSTALLATION
What are you installing?
Choose your product for installation instructions, or open motor pairing and troubleshooting.
Start with your product.
Choose a guide from the dropdown above to get started.
Your installation guide
Plantation Shutter Installation Instructions
Installing Plantation Shutters is not as intimidating as it might seem. If you can confidently use a power drill, you will be able to install your own plantation shutters. Here are a few tips we always recommend when it comes time to install:
- Shutter louvers close in the up position. If your louvers fully close in the down position, the panel is upside down
- Fully charge your drill before you begin installation
- Installation is always easier with a second person to help, especially on outside mount shutters
- Caulk is your friend on inside mount L frames and to seal any gaps where the ends of the frame join together
Window/Room Label
Locate the coordinating window of each shutter using the following label found on the packaging.
 Enlarge diagram
Screws can be misplaced in transit, if you are missing screws, you can use standard 2" threaded screws to secure your shutter frame.
1. Assemble the Frame (Hybrid/Poly)Watch the installation video
See the instructions for painted/stained wood frames below.
2. Pre-Drill HolesWatch the installation video
3. Mount the Frame (Inside Mount)Watch the installation video
3. Mount the Frame (Outside Mount)Watch the installation video
4. Hang the PanelWatch the installation video
5. Rack the ShutterWatch the installation video
6. Finishing TouchesWatch the installation video
Your installation guide
Roller shades installation
Your roller shade uses snap-in brackets that engage the top and rear of the valance.
Before you start
Unpack your shade, check the hardware and ask a second person to help support it during installation.
Tools to have ready
- Pencil and ruler
- Tape measure
- Screwdriver
- Spirit level
- Drill and suitable bits
- Protective equipment
The manuals show a 6 mm hole for the supplied expansion anchors. Match your drill bit and fixing method to the actual anchor and mounting surface.
Check your hardware
- Shade and valance
- A · Snap-in mounting brackets
- B · Screws
- Wall anchors: choose the type suited to your mounting surface
Use the brackets supplied for your shade width. A standard bracket uses two screws in opposite holes; its four-hole design allows two extra screws when required.
 Enlarge diagram
| Shade width | Brackets (A) | Screws (B) |
|---|---|---|
| Up to 47 inUp to 120 cm | 2 | 4 |
| Over 47–63 inOver 120–160 cm | 3 | 6 |
| Over 63–94 inOver 160–240 cm | 4 | 8 |
| Over 94–118 inOver 240–300 cm | 5 | 10 |
Width bands and rounded inch equivalents are shown as listed in the manual. Use all mounting brackets supplied with your shade.
Choose your mounting position
Inside mountAttach the brackets within the window recess.
-
Step 1
Position the brackets
Hold your roller shade and valance at the intended position inside the window recess. Use a level, mark the bracket positions, and check the placement diagram before drilling.
Bracket-spacing dimension d: greater than 0 and less than 7.6 cm (approximately 3 in), as specified for this mounting system.
 Enlarge diagram
-
Step 2
Fasten the brackets
Fix the brackets to the top of the recess. Use at least two screws through opposite holes in each bracket. Four holes are available if extra screws are needed for stability. Select anchors suited to the mounting surface.
 Enlarge diagram
-
Step 3
Hook the valance into place
With a helper supporting the roller shade, engage the groove at the top of the valance with the latch on each mounting bracket.
 Enlarge diagram
-
Step 4
Press back to engage the clips
Press the valance toward the back of the brackets. Rotate it into position so that the top and rear catches engage.
 Enlarge diagram
-
Step 5
Check that the shade is locked
Confirm that both the top and rear of every bracket have locked into the valance. Check for looseness before releasing your support, then check that your roller shade is secure.
 Enlarge diagram
Outside mountAttach the brackets above or outside the window opening.
-
Step 1
Position the brackets
Hold your roller shade and valance at the chosen height above the window. Keep the brackets level, mark their positions, and check the placement diagram before drilling.
Bracket-spacing dimension d: greater than 0 and less than 7.6 cm (approximately 3 in), as specified for this mounting system.
Enlarge diagram
-
Step 2
Fasten the brackets
Fix the brackets to the mounting surface through their rear holes. Use at least two screws through opposite holes in each bracket. Four holes are available if extra screws are needed for stability. Select anchors suited to the mounting surface.
 Enlarge diagram
-
Step 3
Hook the valance into place
With a helper supporting the roller shade, engage the groove at the top of the valance with the latch on each mounting bracket.
Enlarge diagram
-
Step 4
Press back to engage the clips
Press the valance toward the back of the brackets. Rotate it into position so that the top and rear catches engage.
Enlarge diagram
-
Step 5
Check that the shade is locked
Confirm that both the top and rear of every bracket have locked into the valance. Check for looseness before releasing your support, then check that your roller shade is secure.
Enlarge diagram
Removing your shadeHow to release the headrail or valance safely.
Release the valance clips
Have a helper support your roller shade. Press the metal retaining washer at the rear of the mounting bracket. The rear catch releases so the valance can be removed. Keep supporting the shade as you release the remaining brackets.
 Enlarge diagram
Your installation guide
Woven wood shades installation
Your woven wood shade attaches to bracket bolts through the headrail slots and is secured with wing nuts.
Before you start
Unpack your shade, check the hardware and ask a second person to help support it during installation.
Tools to have ready
- Pencil and ruler
- Tape measure
- Screwdriver
- Spirit level
- Drill and suitable bits
- Protective equipment
The manuals show a 6 mm hole for the supplied expansion anchors. Match your drill bit and fixing method to the actual anchor and mounting surface.
Check your hardware
- A · Woven wood shade × 1
- B · Mounting brackets × 2
- C · Screws × 8
- D · Wing nuts × 2
- E · Cord cleat × 1, for cord-lift shades only
Wider shades include additional mounting brackets. The cord cleat is supplied only with cord-lift shades.
 Enlarge diagram
Choose your mounting position
Inside mountAttach the brackets within the window recess.
-
Step 1
Mark and drill at the headrail slots
Locate the pre-drilled slots in your woven wood shade’s headrail. Mark the bracket positions on the window frame, 1–2 inches from the slot ends as shown in the manual. Keep the holes aligned and level, then drill for your chosen fixings.
 Enlarge diagram
-
Step 2
Secure the brackets
Align the mounting brackets (B) with the drilled holes. Fasten them using screws (C). Check that each bracket sits flush and is firmly secured so the shade will not tilt.
 Enlarge diagram
-
Step 3
Fit the headrail and tighten the wing nuts
Keep the front of your woven wood shade facing the room. With a helper supporting it, align the headrail slots with the bracket bolts and pass the bolts through the slots. Tighten the wing nuts (D) firmly to secure the shade.
 Enlarge diagram
Outside mountAttach the brackets above or outside the window opening.
-
Step 1
Set the height and mark the brackets
Hold your woven wood shade at the desired height above the window. Use the pre-drilled headrail slots to mark the bracket positions, 1–2 inches from the slot ends. Check that the brackets are level and aligned, then drill pilot holes for your chosen fixings.
 Enlarge diagram
-
Step 2
Secure the brackets
Align the mounting brackets (B) with the drilled holes and fasten them using screws (C). Check that each bracket is flush and tight to prevent the shade from tilting.
 Enlarge diagram
-
Step 3
Lift the shade onto the bolts
Keep the front of your woven wood shade facing the room. Lift it onto the bracket bolts until the bolts pass through the headrail slots. While the shade is supported, tighten the wing nuts (D) firmly.
 Enlarge diagram
Removing your shadeHow to release the headrail or valance safely.
Loosen the wing nuts
Support your woven wood shade securely. Turn the wing nuts (D) counterclockwise to loosen them, then gently lower the shade from the brackets. Unscrew the brackets from the wall only if you also need to remove the hardware.
 Enlarge diagram
Your installation guide
Zebra shades installation
Your Zebra shade uses snap-in brackets that engage the top and rear of the valance.
Before you start
Unpack your shade, check the hardware and ask a second person to help support it during installation.
Tools to have ready
- Pencil and ruler
- Tape measure
- Screwdriver
- Spirit level
- Drill and suitable bits
- Protective equipment
The manuals show a 6 mm hole for the supplied expansion anchors. Match your drill bit and fixing method to the actual anchor and mounting surface.
Check your hardware
- Shade and valance
- A · Snap-in mounting brackets
- B · Screws
- Wall anchors: choose the type suited to your mounting surface
Use the brackets supplied for your shade width. A standard bracket uses two screws in opposite holes; its four-hole design allows two extra screws when required.
Enlarge diagram
| Shade width | Brackets (A) | Screws (B) |
|---|---|---|
| Up to 47 inUp to 120 cm | 2 | 4 |
| Over 47–63 inOver 120–160 cm | 3 | 6 |
| Over 63–94 inOver 160–240 cm | 4 | 8 |
| Over 94–118 inOver 240–300 cm | 5 | 10 |
Width bands and rounded inch equivalents are shown as listed in the manual. Use all mounting brackets supplied with your shade.
Choose your mounting position
Inside mountAttach the brackets within the window recess.
-
Step 1
Position the brackets
Hold your Zebra shade and valance at the intended position inside the window recess. Use a level, mark the bracket positions, and check the placement diagram before drilling.
Bracket-spacing dimension d: greater than 0 and less than 7.6 cm (approximately 3 in), as specified for this mounting system.
Enlarge diagram
-
Step 2
Fasten the brackets
Fix the brackets to the top of the recess. Use at least two screws through opposite holes in each bracket. Four holes are available if extra screws are needed for stability. Select anchors suited to the mounting surface.
Enlarge diagram
-
Step 3
Hook the valance into place
With a helper supporting the Zebra shade, engage the groove at the top of the valance with the latch on each mounting bracket.
Enlarge diagram
-
Step 4
Press back to engage the clips
Press the valance toward the back of the brackets. Rotate it into position so that the top and rear catches engage.
Enlarge diagram
-
Step 5
Check that the shade is locked
Confirm that both the top and rear of every bracket have locked into the valance. Check for looseness before releasing your support, then check that your Zebra shade is secure.
Enlarge diagram
Outside mountAttach the brackets above or outside the window opening.
-
Step 1
Position the brackets
Hold your Zebra shade and valance at the chosen height above the window. Keep the brackets level, mark their positions, and check the placement diagram before drilling.
Bracket-spacing dimension d: greater than 0 and less than 7.6 cm (approximately 3 in), as specified for this mounting system.
Enlarge diagram
-
Step 2
Fasten the brackets
Fix the brackets to the mounting surface through their rear holes. Use at least two screws through opposite holes in each bracket. Four holes are available if extra screws are needed for stability. Select anchors suited to the mounting surface.
Enlarge diagram
-
Step 3
Hook the valance into place
With a helper supporting the Zebra shade, engage the groove at the top of the valance with the latch on each mounting bracket.
Enlarge diagram
-
Step 4
Press back to engage the clips
Press the valance toward the back of the brackets. Rotate it into position so that the top and rear catches engage.
Enlarge diagram
-
Step 5
Check that the shade is locked
Confirm that both the top and rear of every bracket have locked into the valance. Check for looseness before releasing your support, then check that your Zebra shade is secure.
Enlarge diagram
Removing your shadeHow to release the headrail or valance safely.
Release the valance clips
Have a helper support your Zebra shade. Press the metal retaining washer at the rear of the mounting bracket. The rear catch releases so the valance can be removed. Keep supporting the shade as you release the remaining brackets.
Enlarge diagram
Your installation guide
Roman shades installation
Your Roman shade uses snap-in brackets that engage the top and rear of the valance.
Before you start
Unpack your shade, check the hardware and ask a second person to help support it during installation.
Tools to have ready
- Pencil and ruler
- Tape measure
- Screwdriver
- Spirit level
- Drill and suitable bits
- Protective equipment
The manuals show a 6 mm hole for the supplied expansion anchors. Match your drill bit and fixing method to the actual anchor and mounting surface.
Check your hardware
- Shade and valance
- A · Snap-in mounting brackets
- B · Screws
- Wall anchors: choose the type suited to your mounting surface
Use the brackets supplied for your shade width. A standard bracket uses two screws in opposite holes; its four-hole design allows two extra screws when required.
Enlarge diagram
| Shade width | Brackets (A) | Screws (B) |
|---|---|---|
| Up to 47 inUp to 120 cm | 2 | 4 |
| Over 47–63 inOver 120–160 cm | 3 | 6 |
| Over 63–94 inOver 160–240 cm | 4 | 8 |
| Over 94–118 inOver 240–300 cm | 5 | 10 |
Width bands and rounded inch equivalents are shown as listed in the manual. Use all mounting brackets supplied with your shade.
Choose your mounting position
Inside mountAttach the brackets within the window recess.
-
Step 1
Position the brackets
Hold your Roman shade and valance at the intended position inside the window recess. Use a level, mark the bracket positions, and check the placement diagram before drilling.
Bracket-spacing dimension d: greater than 0 and less than 7.6 cm (approximately 3 in), as specified for this mounting system.
Enlarge diagram
-
Step 2
Fasten the brackets
Fix the brackets to the top of the recess. Use at least two screws through opposite holes in each bracket. Four holes are available if extra screws are needed for stability. Select anchors suited to the mounting surface.
Enlarge diagram
-
Step 3
Hook the valance into place
With a helper supporting the Roman shade, engage the groove at the top of the valance with the latch on each mounting bracket.
Enlarge diagram
-
Step 4
Press back to engage the clips
Press the valance toward the back of the brackets. Rotate it into position so that the top and rear catches engage.
Enlarge diagram
-
Step 5
Check that the shade is locked
Confirm that both the top and rear of every bracket have locked into the valance. Check for looseness before releasing your support, then check that your Roman shade is secure.
Enlarge diagram
Outside mountAttach the brackets above or outside the window opening.
-
Step 1
Position the brackets
Hold your Roman shade and valance at the chosen height above the window. Keep the brackets level, mark their positions, and check the placement diagram before drilling.
Bracket-spacing dimension d: greater than 0 and less than 7.6 cm (approximately 3 in), as specified for this mounting system.
Enlarge diagram
-
Step 2
Fasten the brackets
Fix the brackets to the mounting surface through their rear holes. Use at least two screws through opposite holes in each bracket. Four holes are available if extra screws are needed for stability. Select anchors suited to the mounting surface.
Enlarge diagram
-
Step 3
Hook the valance into place
With a helper supporting the Roman shade, engage the groove at the top of the valance with the latch on each mounting bracket.
Enlarge diagram
-
Step 4
Press back to engage the clips
Press the valance toward the back of the brackets. Rotate it into position so that the top and rear catches engage.
Enlarge diagram
-
Step 5
Check that the shade is locked
Confirm that both the top and rear of every bracket have locked into the valance. Check for looseness before releasing your support, then check that your Roman shade is secure.
Enlarge diagram
Removing your shadeHow to release the headrail or valance safely.
Release the valance clips
Have a helper support your Roman shade. Press the metal retaining washer at the rear of the mounting bracket. The rear catch releases so the valance can be removed. Keep supporting the shade as you release the remaining brackets.
Enlarge diagram
For motorized shades
Motor setup and troubleshooting
Everything here is done with the motor and its remote. Nothing on this page needs an app, a hub or a phone.
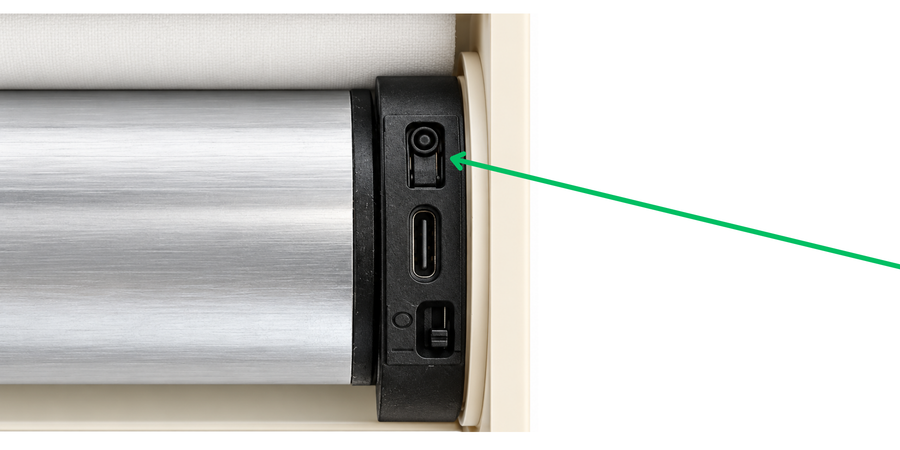
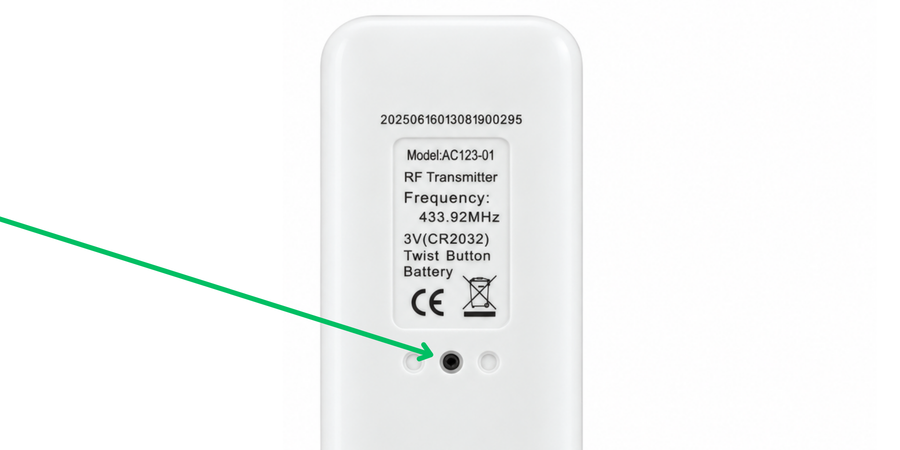
Two buttons do most of the work: PROG on the motor head, and PROG on the back of the remote. They are shown below.
Setup
Turn the motor on and offThe motor ignores the remote completely while it is switched off.
-

Turn the dial switch on the motor head to the right. The red light flashes to say it is on.
-

Turn it to the left to switch the motor off.
Charge the batteryAbout four hours from flat. The light is red while charging and green when it is full.
-

Plug the USB charger into the port on the motor head.
-
Unplug it once the light turns green. Leaving it on the charger does the battery no good.
Put the motor into setting modeSetting mode ends by itself after 10 seconds with no button press. Most of the procedures below start here.
-

Press PROG on the motor head for 1 second.
-

Or, if a remote is already paired, hold STOP on it for 5 seconds.
-

The motor jogs once. It is in setting mode.
Pair a remote
-
Put the motor into setting mode.
-

Press UP on the remote you want to pair.
-
The motor jogs once. That remote is paired.
Swap which way it runsIf pressing UP sends the shade down, this is the fix.
-
Put the motor into setting mode.
-

Press DOWN.
-
The motor jogs once. Up and down are now the other way round.
Set the first limitThe first limit can be the top or the bottom. Whichever you choose here, the other one is set the same way afterwards.
-

Press PROG on the back of the paired remote for 1 second.
-
The motor jogs once.
-
Press UP to make the top your first limit, or DOWN to make it the bottom.
-
Run the shade to where that limit should be, press STOP, then press PROG.
-
The motor jogs once. The limit is saved.
Set the other limitsLimit setting ends by itself after 30 seconds with no button press. Six limits in all: the top, the bottom, and four positions in between.
-
Run the shade to the position you want, press STOP, then hold PROG for 1 second.
-
The motor jogs once.
-
Press PROG again.
-
The motor jogs once more. That limit is saved.
Nudge a limit that is slightly offThe top and bottom can each be nudged once. After that only a reset will clear them.
-
Run the shade to the limit you want to change, then press PROG once.
-
The motor jogs once.
-
Move the shade to where it should have stopped.
-
Press PROG to save it.
-
The motor jogs once. The limit has moved.
Adjust the tiltZebra shades only, where the vanes have to line up.
-

Hold UP and DOWN together for 5 seconds.
-
The motor jogs. It is in tilt adjustment.
-

Hold STOP and press UP for more tilt.
-

Hold STOP and press DOWN for less.
-
Hold STOP for 2 seconds to save and come out.
-
The motor jogs once. The tilt is saved.
Switch between one press and step by stepContinuous is how it arrives: one press runs the shade all the way to its limit. Step by step moves it a little at a time, which is easier when you are lining something up. App control is always continuous.
-
Put the motor into setting mode.
-
Press STOP.
-
The motor jogs once. It has swapped to the other one.
Undo and reset
Delete one limit
-
Run the shade to the limit you want gone, then hold PROG for 7 seconds.
-
It jogs after a second, then again after seven. That limit is deleted.
Unpair a remoteUnpairs the remote you press it on, and leaves the others alone.
-
Put the motor into setting mode.
-
Press PROG on the back of the remote you want to remove.
-
The motor jogs once. That remote is unpaired.
Reset the motor, using the motorClears the remotes, the limits and the direction. Leave less than a second between these steps or the motor will not follow them.
-
Press PROG and let go the moment the red light comes on.
-
Press PROG again and let go when the red light comes on.
-
Hold PROG for 3 seconds and let go when the red light flashes twice.
-
Hold PROG until the motor jogs twice. It is reset.
Reset the motor, using a remoteThe same reset, if the motor head is out of reach.
-
Hold STOP on a paired remote for 5 seconds.
-
The motor jogs once.
-
Within 10 seconds, hold PROG on the back of the remote for 7 seconds.
-
It jogs once, then twice more. It is reset.
If something is wrong
Nothing happens when I press the remote
-
Check the dial switch on the motor head is turned to the right.
-
Charge it. A flat battery looks exactly like a dead motor.
-
If it still does nothing, pair the remote again.
It stops partway and will not go further
-
Something is in its way, or the shade is catching. The motor stops itself rather than forcing it. Clear whatever it is and try again.
-
If nothing is in the way, charge it. The motor protects itself when the battery is low.
It moves in little steps instead of running
-
Either it is in step-by-step mode, which is the procedure above, or the battery is low. Charge it first and see whether it goes back to normal.
The setting did not take
-
Setting mode ends by itself after 10 seconds, and limit setting after 30. If you paused mid-way, start the procedure again and do not stop in the middle.
It will not move at all, even on the charger
-
Leave it charging for six hours, then try again. If it still does nothing, check the shade is installed square and nothing is binding the tube.
Connecting a motor to Alexa, Apple Home or Google Home is a separate guide.